As questions go, this is definitely one I couldn’t have anticipated being an immediately obvious candidate when I started my data visualisation career. It’s certainly “niche”. But has all followed from the paths I continue to be fascinated by. I often return for inspiration to my ideas of fabric inspired visualisations and steganography taking inspiration from Jordan Cunliffe. And I continue to look for visual mathematical ways I can tile the surface and visualise information, such as the use of Truchet tiles. These two ideas, combined, led me to the concept of Hitomezashi.
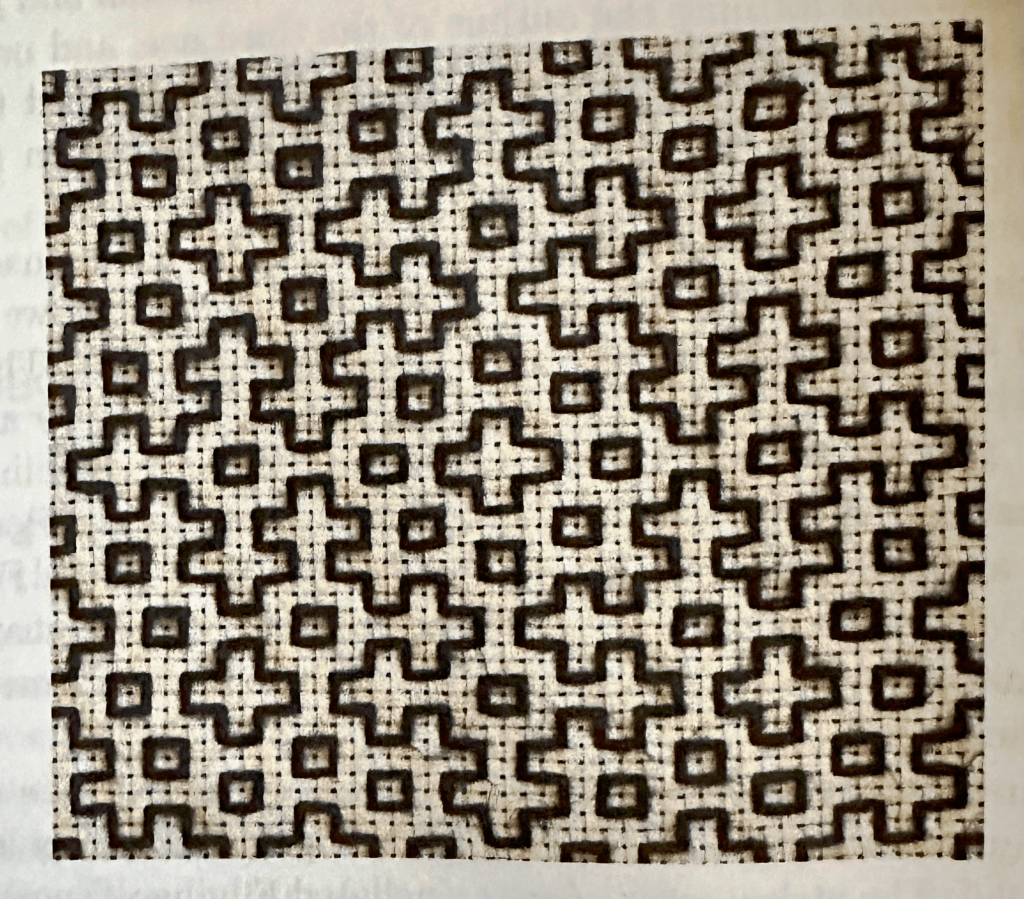
I actually stumbled on it from a daily “bot” that generates a digital version of a hitomezashi using randomly generated patterns (see below), which prompted me to delve more into the subject. Hitomezashi is a form of Sashiko: a type of traditional Japanese embroidery or stitching used for the decorative and/or functional reinforcement of cloth and clothing. Hitomezashi means “one-stitch Sashiko”, and uses single stitches across and down a grid pattern, whose alignment leads to geometrical grid patterns. Such patterns are instantly recognisable as hitomezashi, and can lead to some fascinating shapes and patterns.

The key to hitomezashi is that if you follow your eye (or your needle) across any given horizontal line in the grid, it will take the form of a perfectly alternating dotted line (digital) or stitch (physical). There are just two possibilities: starting at the first available column, or starting at second column – creating the opposite/offset dotted line pattern. And it’s the same principle for every vertical line in the grid which can only take two possible positions – again, these are simple alternating dotted lines or stitches.
So what it means from a data perspective is that every row, and every column, can be described (and therefore encoded) in just two ways. This means that we can consider each row/column as a boolean, a 0 or 1. Take a look a the horizontal dotted lines – if they start in the first column (and are repeated in columns 3,5,7 …) that could be encoded as a zero, and if they start in the second column (and are repeated in 4,6,8 …) that’s a one.
Now all this was leading me to the idea of generating individual hitomezashi patterns from data such as words and numbers, but there are times when a question and an idea leads you to something that might be brand new to yourself, but that has already been done! I soon found out that recently my friend and fellow Tableau Visionary Annabelle Rincon had taken inspiration from a YouTube clip from Aiyliean MacDonald’s on Numberphile a couple of years ago, where she introduced hitomezashi designs (with pen and paper) to demonstrate how patterns could be generated with 0 and 1. Text, such as names, could be converted into 1 and 0 by categorising as vowels and consonants, allowing you to generate your own hitomezashi patterns, and this inspired Annabelle to create an online version in Tableau allowing the user to create their own personalised generated hitomezashi pattern.
Here’s Annabelle’s awesome interactive version – be sure to click through to https://public.tableau.com/app/profile/rincon/viz/HitomezashiMakeArtwithMaths/Hitomezashi to read through her explanation and try it yourself!

This didn’t stop me trying to recreate something similar. An alternative way of converting letters to something binary could be Morse code – dots and dashes easily converting to true/false or 1/0 pairs. See how the grid lines align to dots or dashes respectively to create a unique pattern in the image below. Admittedly the encoding is not quite unique, because I haven’t coded in gaps between letters, so for example any particular four dot combination “. . . . ” could be “H”, or “EEEE”, or “II” . To be sure of a unique 1 to 1 correlation between word and binary string, maybe one option would be to encode a Morse dot as 01, dash as 10 and gap between letters as 00? But I’m here to be creative and have fun visualising data, not to create a perfect cipher!

So after deciding that the data visualisation / steganography possibilities of hitomezashi were quite limited, I wanted to look more into the mathematics of it. The Numberphile video mentioned above had already touched on it – which combinations of 0 and 1 can generate which patterns, which looked more random and which more structured? To continue my hitomezashi learning I was intrigued enough to buy “A Stitch in Line” by Katherine Seaton – a book focusing on the mathematics of One-Stitch Sashiko (which I now knew meant Hitomezashi).

Unusually for me, I won’t give the book a full review here, but if this post (or Numberphile, or Annabelle, or the hitomezashi bot, or anything else you might have come across) makes you want to look further into possibilities of designing or stitching hitomezashi, I thoroughly recommend it. It’s packed with examples (many from the author’s hand herself) and discusses symmetry, patterns, coding (such as the Morse code idea, which I “borrowed” from the book), randomness, and all sorts of other features. The mathematics is not too detailed, and can easily be bypassed if it’s not your thing.
But what caught my eye most was a chapter wholly dedicated to a particular pattern – the snowflake. Certain combinations of 1/0 combinations have the potential to give striking symmetrical snowflake patterns. In fact, not only are they known as snowflakes, but Fibonacci Snowflakes. This mathematical connection definitely piques my interest! Below (from A Stitch in Line) are the first three Fibonacci Snowflakes (orders 1,2,3 respectively)

The question inspiring this post was “What are Fibonacci Snowflakes?”. So it’s only fair that I try and explain the relevance of the Fibonacci sequence. If you don’t want to know the maths you can skip to the picture at the bottom of this post, as I don’t want you to jump out of this blog post without seeing the showpiece picture at the bottom!
Each of the Fibonacci snowflakes is generated from a type of “walk” – shown below for the first three orders. These walks can be rotated in four different directions and put together to make a snowflake shape, therefore always symmetrical (order 4, reflective and rotational). And they’re not random walks because they’re generated by specific Fibonacci numbers.

Why Fibonacci? I’ll give it a go … we might all remember the Fibonacci sequence 1,1,2,3,5,8,13, …. where each number is generated by adding the two previous numbers. Well there’s also a binary Fibonacci sequence where we append, rather than add, the two previous binary elements to each other. The first elements are 0, 01, 010, 01001, 01001010, 0100101001001, 010010100100101001010, 0100101001001010010100100101001001 (for number n, we’re appending number n-2 to the right hand end of n-1).
Now with each of these binary strings, look at them in groups of 2 digits. Each of the groups of 2 can be 01 (this becomes R: right), 10 (this becomes L: left) or 00 (we’ll give this an asterisk – just think of them as “stay still”). Apparently the group 11 never happens! That means the first binary Fibonacci (01) becomes simply R. The fourth (010010101) becomes R*LL. And the seventh (0100101001001010010100100101001001) becomes R*LLR*LLRR*LRR*LR.
Now start facing East and start the walk: R means turn 90 degrees right and walk one square, and L means turn 90 degrees left and walk one square. And * means don’t do anything! So the three examples in the above paragraph lead to the walks in the diagram above.
So why did I pick 1,4,7 and not other numbers? That’s down to a clever person called Monnerot-Dumaine. I’ll assume that’s one clever person, and not two clever people called Monneroy-Dumaine. In 2009 they proposed, and then proved, that the numbers where the above system works (converting binary strings to walks and then to snowflakes) are for the binary Fibonacci numbers 3k+1 (i.e. 1,4,7,10,13 etc). If you wanted to work out what the fourth snowflake looks like, you would start with the tenth Fibonacci, convert to its walk sequence, make four rotated copies of it and generate its snowflake. And it would look like this.
All of which is fun to work out, if you like that sort of thing, but beyond my capabilities of calculating and generating in code (in Tableau, my data visualisation tool of choice). Generating snowflakes algorithmically is going to be tricky. But the knowledge that any hitomezashi pattern can be generated just by adjusting rows and columns by 0 or 1 spaces means that there’s not too much code to implement, and makes it possible to generate simply by observing a snowflake that’s already been created. Once I figured out the first half of the horizontal positions as 0 or 1, I knew that the second half of the horizontal positions were exactly the same reflected. And better still, the 0/1 combination for vertical positions is exactly the same, due to its symmetry. I was soon(-ish) able to recreate the order 5 snowflake, the stitched version of which was shown in Katherine Seaton’s book. And here it is:
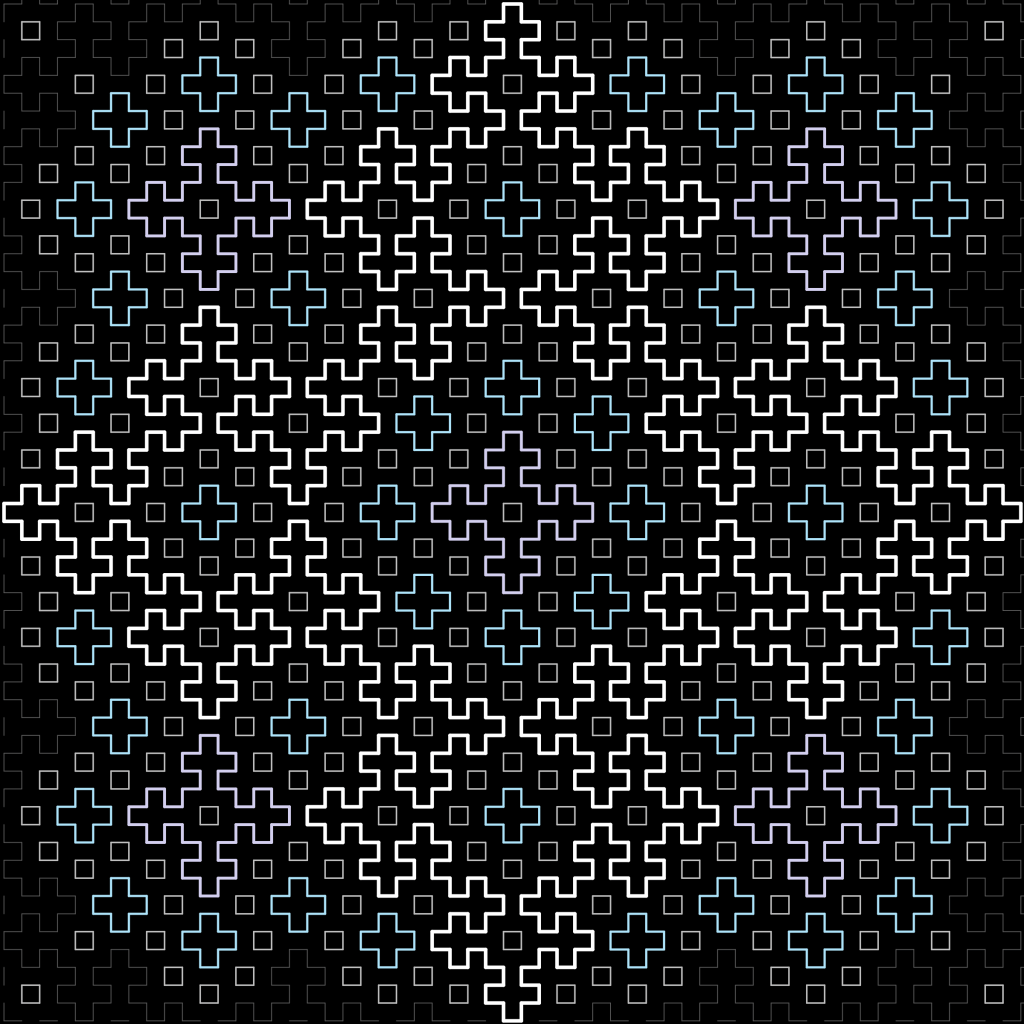
Creating it digitally has allowed me to add my own colours to highlight the beautiful order 5 snowflake, which in itself contains snowflakes of orders 1,2 and 3 inside it (highlighted in grey, blue and lilac respectively).
I love this image, and I love the journey of discovery that took me there – via social media bots, physical fabric visualisation, Tableau visionaries, books, YouTube, and mathematics. Quite a combination!
